本文最后更新于 34 天前,其中的信息可能已经有所发展或是发生改变。

概念
Linux遵循“一切皆是文件”的设计理念,大多数交互工作都通过读取和写入文件来完成。文件必须被打开才能被访问,一个打开的文件通过唯一的文件描述符(file descriptor,fd)进行引用,该描述符是打开文件元数据到其本身的映射,在Linux内核中用整数表示。
文件描述符0、1、2被系统分别预留给标准输入(stdin)、标准输出(stdout)和标准错误(stderr)。新打开的文件描述符从3开始依次分配。
系统调用I/O——open()
函数原型
#include <sys/types.h>
#include <sys/stat.h>
#include <fcntl.h>
#include <unistd.h>

int open(const char *pathname, int flags);
int open(const char *pathname, int flags, mode_t mode);
参数说明
- pathname:要打开或创建的文件路径(绝对路径或相对路径)
- flags:打开方式标志,必须指定以下三个互斥模式之一:
O_RDONLY:只读O_WRONLY:只写O_RDWR:读写
- mode:仅在flags包含O_CREAT时有效,用于设置新建文件的权限。如0644表示用户可读写,组用户和其他用户只可读。最终权限 = mode &~ umask
- 返回值:成功返回文件描述符(非负整数),失败则返回-1
代码案例
/**
 * open_demo.c - 演示open()函数的多种打开方式
 * 编译:gcc open_demo.c -o open_demo
 * 运行:./open_demo
 */
#include <stdio.h>
#include <stdlib.h>
#include <fcntl.h>
#include <unistd.h>
#include <errno.h>
#include <string.h>

int main() {
    int fd;

    // 方式1:只读打开,文件不存在则创建,权限644
    fd = open("./test1.txt", O_RDONLY | O_CREAT, 0644);
    if (fd == -1) {
        perror("open test1 failed");
    } else {
        printf("test1.txt opened, fd = %d (O_RDONLY | O_CREAT)\n", fd);
        close(fd);
    }

    // 方式2:只读打开,若存在则清空(截断为0)
    fd = open("./test2.txt", O_RDONLY | O_CREAT | O_TRUNC, 0644);
    if (fd == -1) {
        perror("open test2 failed");
    } else {
        printf("test2.txt opened, fd = %d (O_RDONLY | O_CREAT | O_TRUNC)\n", fd);
        close(fd);
    }

    // 方式3:读写打开,不存在则创建,权限664
    fd = open("./test3.txt", O_RDWR | O_CREAT, 0664);
    if (fd == -1) {
        perror("open test3 failed");
    } else {
        printf("test3.txt opened, fd = %d (O_RDWR | O_CREAT)\n", fd);
        close(fd);
    }

    // 方式4:追加模式写入(不需要文件存在,这里先创建)
    fd = open("./test4.txt", O_WRONLY | O_CREAT | O_APPEND, 0644);
    if (fd == -1) {
        perror("open test4 failed");
    } else {
        const char *msg = "Appended line\n";
        write(fd, msg, strlen(msg));
        printf("test4.txt opened in append mode, wrote: %s", msg);
        close(fd);
    }

    return 0;
}
系统调用I/O——read()、write()、close()
函数原型
#include <unistd.h>

ssize_t read(int fd, void *buf, size_t count);
ssize_t write(int fd, const void *buf, size_t count);
int close(int fd);
功能说明
- read():从文件描述符fd指向的文件的当前偏移量最多读取count个字节到buf中。成功返回实际读入字节数,失败返回-1
- write():将buf中的最多count个字节写入fd指向的文件。成功返回实际写入字节数,失败返回-1
- close():关闭文件描述符,释放系统资源
代码案例:文件拷贝
/**
 * file_copy.c - 使用read/write实现文件拷贝(类似cp命令)
 * 编译:gcc file_copy.c -o file_copy
 * 运行:./file_copy 源文件 目标文件
 * 示例:./file_copy src.txt dst.txt
 */
#include <stdio.h>
#include <stdlib.h>
#include <fcntl.h>
#include <unistd.h>
#include <errno.h>
#include <string.h>

#define BUFFER_SIZE 4096

int main(int argc, char *argv[]) {
    int src_fd, dst_fd;
    ssize_t bytes_read, bytes_written;
    char buffer[BUFFER_SIZE];

    if (argc != 3) {
        fprintf(stderr, "Usage: %s <source_file> <destination_file>\n", argv[0]);
        exit(EXIT_FAILURE);
    }

    // 打开源文件(只读)
    src_fd = open(argv[1], O_RDONLY);
    if (src_fd == -1) {
        perror("Failed to open source file");
        exit(EXIT_FAILURE);
    }

    // 打开目标文件(读写|创建|截断,权限644)
    dst_fd = open(argv[2], O_WRONLY | O_CREAT | O_TRUNC, 0644);
    if (dst_fd == -1) {
        perror("Failed to open destination file");
        close(src_fd);
        exit(EXIT_FAILURE);
    }

    // 核心拷贝循环
    while ((bytes_read = read(src_fd, buffer, BUFFER_SIZE)) > 0) {
        bytes_written = write(dst_fd, buffer, bytes_read);
        if (bytes_written != bytes_read) {
            perror("Write error");
            close(src_fd);
            close(dst_fd);
            exit(EXIT_FAILURE);
        }
    }

    if (bytes_read == -1) {
        perror("Read error");
    } else {
        printf("File copied successfully!\n");
    }

    close(src_fd);
    close(dst_fd);
    return 0;
}
系统调用I/O——lseek()
函数原型
#include <unistd.h>

off_t lseek(int fd, off_t offset, int whence);
参数说明
- whence决定文件偏移的计算方式:SEEK_SET(从文件开头偏移offset字节)、SEEK_CUR(从当前偏移)、SEEK_END(从文件末尾)
- 返回值:成功返回新的文件偏移量,失败返回-1
- offset:偏移量(单位:字节),正数代表向右偏移,负数则向左偏移
代码案例:获取文件大小并定位读写
#include <stdio.h>
#include <stdlib.h>
#include <fcntl.h>
#include <unistd.h>
#include <string.h>

int main(int argc, char *argv[])
{
    int fd;
    char buf[] = "HELLO LINUX!";  // 要写入的内容
    int len = strlen(buf);

    // 1. 打开文件(可读可写,不存在则创建)
    fd = open("test.txt", O_RDWR | O_CREAT, 0644);
    if (fd == -1) {
        perror("open failed");
        exit(1);
    }

    // 2. 定位到文件末尾,读取文件大小,再写入(追加)
    file_size = lseek(fd, 0, SEEK_END);
    printf("文件大小:%ld bytes\n",(long)file_size);
    write(fd, buf, len);
    printf("已在文件末尾写入:%s\n", buf);

    // 3. 定位到文件开头,再写入(覆盖开头)
    lseek(fd, 0, SEEK_SET);
    write(fd, "START", 5);
    printf("已在文件开头写入:START\n");

    // 4. 定位到偏移 5 字节的位置,再写入
    lseek(fd, 5, SEEK_SET);
    write(fd, "ABCDE", 5);
    printf("已在偏移 5 字节处写入:ABCDE\n");

    close(fd);
    return 0;
}
标准I/O——fopen()、fread()、fwrite()、fclose()
概念
标准I/O库(stdio)在系统调用之上提供了用户态的缓冲区管理,通过减少系统调用次数来提升I/O性能。标准I/O支持三种缓冲类型:
- 全缓冲(_IOFBF) :填满缓冲区后才进行实际I/O,适用于大文件操作
- 行缓冲(_IOLBF) :遇到换行符或填满缓冲区时刷新,适用于文本处理,标准输出通常为行缓冲
- 无缓冲(_IONBF) :立即执行系统调用,标准错误流默认无缓冲
可通过setvbuf()函数动态调整缓冲策略。
常用API
| 函数 | 功能 |
|---|---|
fopen() | 打开流 |
fclose() | 关闭流 |
fread()/fwrite() | 二进制读写 |
fprintf()/fscanf() | 格式化读写 |
fgets()/fputs() | 字符串读写 |
fflush() | 刷新缓冲区 |
setvbuf() | 设置缓冲类型 |
代码案例:读取文件字符/单词/行数
/**
 * stdio_demo.c - 使用标准I/O统计文件中的字符数、单词数和行数
 * 编译:gcc stdio_demo.c -o stdio_demo
 * 运行:./stdio_demo <filename>
 */
#include <stdio.h>
#include <stdlib.h>
#include <ctype.h>

int main(int argc, char *argv[]) {
    FILE *fp;
    int ch;
    int char_count = 0, word_count = 0, line_count = 0;
    int in_word = 0;

    if (argc != 2) {
        fprintf(stderr, "Usage: %s <filename>\n", argv[0]);
        exit(EXIT_FAILURE);
    }

    fp = fopen(argv[1], "r");
    if (fp == NULL) {
        perror("Failed to open file");
        exit(EXIT_FAILURE);
    }

    // 逐字符读取并统计
    while ((ch = fgetc(fp)) != EOF) {
        char_count++;

        if (ch == '\n') {
            line_count++;
        }

        if (isspace(ch)) {
            if (in_word) {
                in_word = 0;
                word_count++;
            }
        } else {
            in_word = 1;
        }
    }

    // 处理文件末尾的单词
    if (in_word) {
        word_count++;
    }

    printf("File: %s\n", argv[1]);
    printf("Characters: %d\n", char_count);
    printf("Words: %d\n", word_count);
    printf("Lines: %d\n", line_count);

    fclose(fp);
    return 0;
}
实践项目:嵌入式Linux串口读写(基于文件I/O)
在嵌入式Linux中,物理串口被抽象为字符设备文件,通常位于/dev/ttyS0、/dev/ttyS1等。这些设备支持标准的文件I/O操作,可通过open()、read()、write()等系统调用进行访问。
/**
 * serial_rw.c - 嵌入式Linux串口 读+写 完整程序
 * 编译:gcc serial_rw.c -o serial_rw
 * 运行:./serial_rw /dev/ttyS1
 * 功能:
 *   1. 自动读取串口发来的数据并打印
 *   2. 键盘输入内容,按回车发送到串口
 */
#include <stdio.h>
#include <stdlib.h>
#include <fcntl.h>
#include <unistd.h>
#include <termios.h>
#include <string.h>
#include <errno.h>
#include <pthread.h>

// 串口文件描述符(全局供线程使用)
int serial_fd;

// 配置串口参数
int set_serial_attr(int fd, int speed) {
    struct termios tty;

    if (tcgetattr(fd, &tty) != 0) {
        perror("tcgetattr");
        return -1;
    }

    // 设置波特率
    cfsetospeed(&tty, (speed_t)speed);
    cfsetispeed(&tty, (speed_t)speed);

    // 8位数据位,无校验,1位停止位
    tty.c_cflag &= ~PARENB;      // 无奇偶校验
    tty.c_cflag &= ~CSTOPB;      // 1位停止位
    tty.c_cflag &= ~CSIZE;
    tty.c_cflag |= CS8;          // 8位数据位
    tty.c_cflag |= CLOCAL | CREAD;  // 本地连接,启用接收器
    tty.c_lflag &= ~(ICANON | ECHO | ECHOE | ISIG);  // 原始输入模式
    tty.c_iflag &= ~(IXON | IXOFF | IXANY);          // 禁用软件流控
    tty.c_iflag &= ~(INLCR | ICRNL | IGNCR);         // 保留原始输入
    tty.c_oflag &= ~OPOST;        // 原始输出模式

    // 设置读取超时
    tty.c_cc[VMIN] = 0;    // 非阻塞读取
    tty.c_cc[VTIME] = 10;  // 1秒超时

    if (tcsetattr(fd, TCSANOW, &tty) != 0) {
        perror("tcsetattr");
        return -1;
    }

    return 0;
}

// 线程1:持续读取串口数据
void *read_thread(void *arg) {
    char buffer[256];
    ssize_t bytes_read;

    while (1) {
        bytes_read = read(serial_fd, buffer, sizeof(buffer)-1);
        if (bytes_read > 0) {
            buffer[bytes_read] = '\0';
            printf("\n[串口接收]: %s\n", buffer);
            printf("[输入发送]: ");
            fflush(stdout);
        } else if (bytes_read == -1 && errno != EAGAIN) {
            perror("read error");
            break;
        }
        usleep(10000);
    }
    return NULL;
}

// 线程2:读取键盘输入,发送到串口
void *write_thread(void *arg) {
    char send_buf[256];

    printf("[输入发送]: ");
    fflush(stdout);

    while (fgets(send_buf, sizeof(send_buf), stdin) != NULL) {
        // 去掉换行符
        send_buf[strcspn(send_buf, "\n")] = 0;

        ssize_t ret = write(serial_fd, send_buf, strlen(send_buf));
        if (ret < 0) {
            perror("write failed");
        } else {
            printf("[已发送]: %s\n", send_buf);
        }

        printf("[输入发送]: ");
        fflush(stdout);
    }
    return NULL;
}

int main(int argc, char *argv[]) {
    pthread_t tid_read, tid_write;

    if (argc != 2) {
        fprintf(stderr, "用法: %s <串口设备>\n", argv[0]);
        fprintf(stderr, "示例: %s /dev/ttyUSB0\n", argv[0]);
        exit(EXIT_FAILURE);
    }

    // 打开串口
    serial_fd = open(argv[1], O_RDWR | O_NOCTTY | O_NONBLOCK);
    if (serial_fd == -1) {
        perror("open serial failed");
        exit(EXIT_FAILURE);
    }

    // 配置 115200 8N1
    if (set_serial_attr(serial_fd, B115200) != 0) {
        close(serial_fd);
        exit(EXIT_FAILURE);
    }

    printf("=========================================\n");
    printf("串口已打开: %s  115200 8N1\n", argv[1]);
    printf("功能:自动接收 + 键盘输入发送\n");
    printf("=========================================\n");

    // 创建线程:同时读写
    pthread_create(&tid_read, NULL, read_thread, NULL);
    pthread_create(&tid_write, NULL, write_thread, NULL);

    // 等待线程结束
    pthread_join(tid_read, NULL);
    pthread_join(tid_write, NULL);

    close(serial_fd);
    return 0;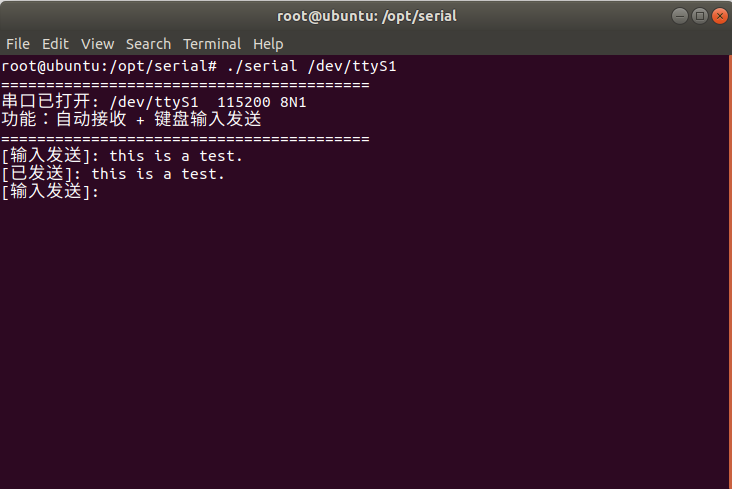
}运行示例:在Linux系统终端运行 ./serial /dev/ttyS1 连接串口COM2(在运行程序前,需要使用Configure Virtual Serial Port Driver创建一对虚拟串口,以下示例基于我事先创建好的虚拟串口COM1和COM2),向串口发送信息“This is a test.”
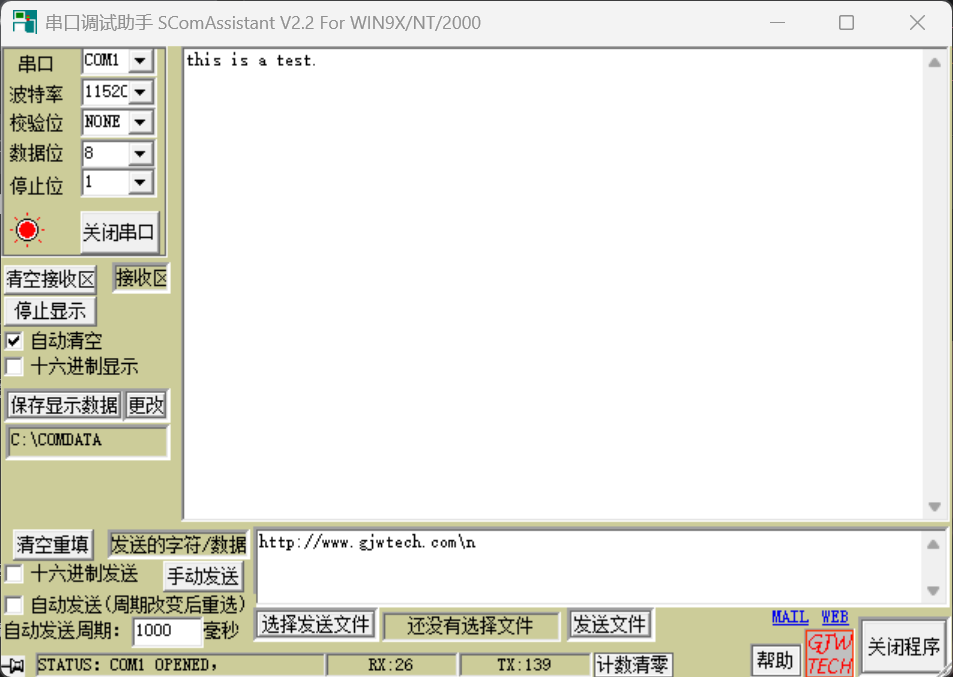
在串口调试助手中串口COM1成功接受到程序发送的消息
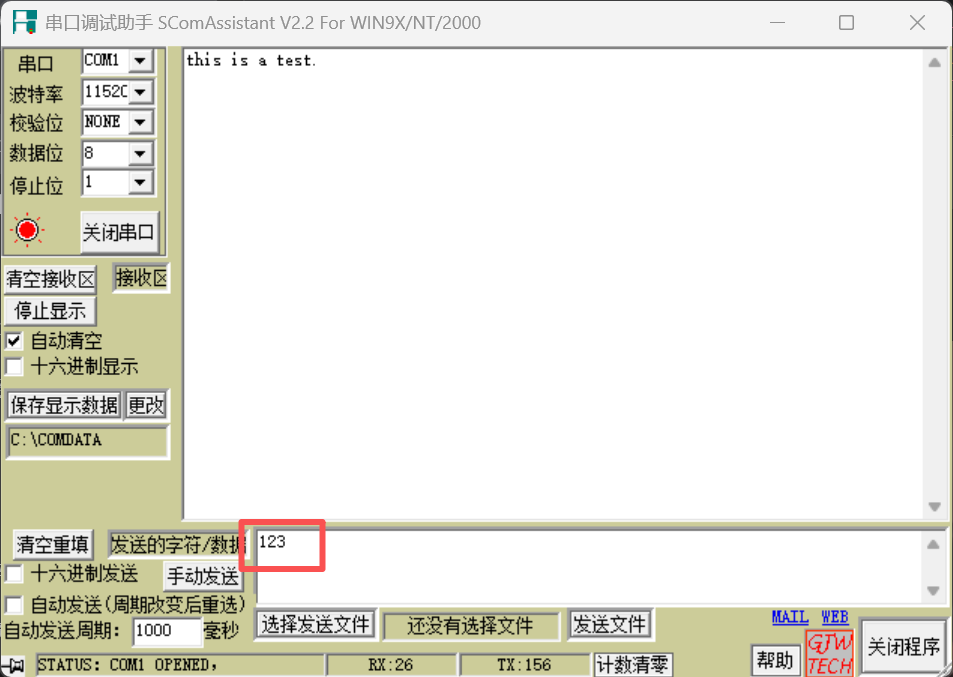
接着测试程序的读取功能,通过串口调试助手向串口COM2发送”123″,点击手动发送
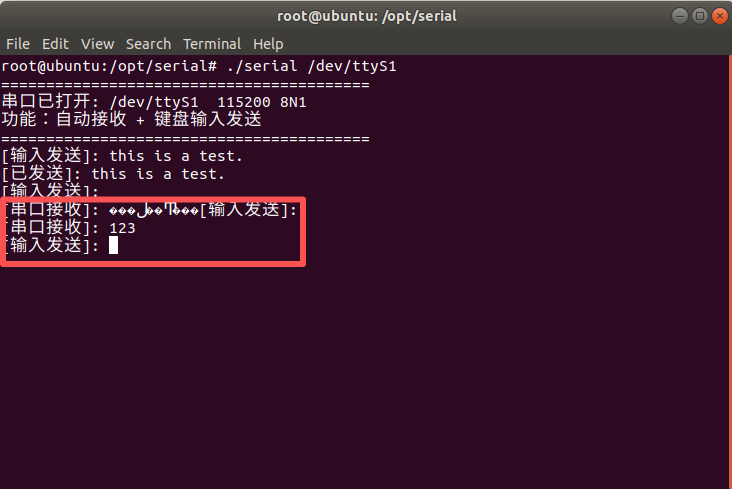
如下图,程序成功接收到消息(乱码是因为程序无法接收到中文信息)
本章内容已经结束了,下一篇文章预告:《多进程编程》,感谢阅读!
| 一 | 二 | 三 | 四 | 五 | 六 | 日 |
|---|---|---|---|---|---|---|
| 1 | 2 | 3 | 4 | 5 | ||
| 6 | 7 | 8 | 9 | 10 | 11 | 12 |
| 13 | 14 | 15 | 16 | 17 | 18 | 19 |
| 20 | 21 | 22 | 23 | 24 | 25 | 26 |
| 27 | 28 | 29 | 30 | 31 | ||